This post is about building an Alfred workflow that allows exporting all image attachments of the currently opened Evernote note as PDF.
Update (2021-02-03)
Judging by a Tweet from the Evernote Support, it looks like they are planning to get applescript support back in the future.
Really hoping they do, currently, there doesn’t seem to be an easy, non-API solution to automate anything.
Update (2021-01-18)
I updated the workflow for the new Evernote electron app.
Since Evernote supports neither Applescript nor x-callback-url now, I had to work around it Selenium style and click on each UI element from Applescript.
It works, but doesn’t look too elegant.
The new workflow can be found here: Source Code on Github
Update (2020-10-09)
With the latest evernote update to electron, it looks like applescript support was dropped completely, therefore, this workflow isn’t working any more.
Since I still need a way to export attachments, I’ll look into using the Evernote API some time, but that won’t be as accessible to other users since you need an API key - or trust a random dude’s application to connect to your Evernote account.
I’ll update this post again in case I find another solution.
I recently started using Evernote for document management purposes. I’m not the biggest fan of its note taking capabilities, but the convenience of taking a picture with the mobile app and having it optimized and indexed as a document is pretty amazing.
However, I still wanted to be able to export the documents I scanned as PDFs which proofed a bit more difficult than expected: Evernote saves its scanned documents as one PNG image per page and attaches each one to the note.
So, why not just print to PDF?
My first idea was indeed to use the print dialog and generate a PDF out of it. However, Evernote adds some pretty substancial margin around the actual image, probably because of lower dpi:


As you can see, I would get a tiny image inside an A4 PDF, not exactly what I was looking for.
Since I didn’t find a proper solution for this problem on the web, I decided to build one myself.
The Applescript Part
Luckily, Evernote has quite extensive Applescript support by now. It doesn’t necessarily make it easy to achieve exactly what you’re trying to do, but it at least gives you a lot of information.
If you are like me and only visit Applescript when you absolutely have to,
here’s something I learned: Most applications with Applescript support come with a dictionary of the things they support.
To view it, open the Script Editor, choose File -> Open Dictionary and select the application you’d like to explore.
I’ll go through the steps I took to get to my final solution and try to show off a few problems I encountered and had to work around.
Getting the Current Note’s Data
Assuming that the user didn’t select a bunch of notes at once and just opened one by clicking on it,
selection is a 1 element list that contains exactly this note object.
tell application "Evernote"
  set notesList to selection
  set oNote to item 1 of notesList

  tell oNote
    ...
  end tell
end tell
Extracting the Attachments
I searched the Evernote Applescript dictionary and found that each note has a list of Attachments
with each of them responding to a write method to extract them to the hard disk. Couldn’t be so difficult then, right?
First, I had to find a suitable filename for the images when saving them to disk.
And I needed them in a certain order to pass them into convert to create a PDF out of them.
The Evernote dictionary gave me a few options here:
- “filename (text or missing value, r/o) : The attachment’s original filename, if available.”
- “hash (text, r/o) : The attachment’s hash (used to identify the attachment in the note’s ENML).”
Since filename was not a guaranteed value neither it nor hash had anything to do with the order of the attachments inside the note, I went with building an own filename using a for-loop’s index variable:
repeat with idx from 1 to count of attachments
  set oAttachment to item idx of attachments

  write oAttachment to "/Users/stex/Downloads/" & idx & ".png"
end repeat
Looks like it should work, but doesn’t. Instead, I was presented with my first error:
error “Evernote got an error: “31EB6536-288F-4A4D-8ADA-1D455165115E.png” couldn’t be copied because you don’t have permission to access “Downloads”.” number 513
What happened here? With the more recent versions of macOS, Apple followed what they already had in place for iOS applications: Each app runs inside its own little file system sandbox and you have to explicitly give it access to folders outside of it. Since I didn’t find a way to give Evernote access to a certain folder from inside Applescript, I chose an output folder instead that I knew Evernote had write access to - its own sandbox.
set evernoteDataFolder to (system attribute "HOME") & "/Library/Containers/com.evernote.Evernote/Data/"

repeat with idx from 1 to count of attachments
  set oAttachment to item idx of attachments

  write oAttachment to evernoteDataFolder & idx & ".png"
end repeat
That got rid of the permission error, but reveiled something else. I was absolutely convinced that the list of attachments Evernote gave me inside Applescript would follow the order of attachments inside the note. But no, it follows the random filenames Evernote assigned them leaving me with no guaranteed order at all.
As far as I could see, there was no way to get the actual attachment order from Evernote, so how to proceed?
Using the Note Content to get the Attachment Order
Luckily, Evernote gives us access to the note’s content both in HTML and ENML format.
While the former is not of interest here, the latter is basically an XML file Evernote uses internally.
Let’s take a look at such a file:
<?xml version="1.0" encoding="UTF-8" standalone="no"?>
<!DOCTYPE en-note SYSTEM "http://xml.evernote.com/pub/enml2.dtd">
<en-note>
  <div>
    <en-media hash="270493a2b1a89ceeb2528f1c0e97d1f5" title="Attachment" width="1979" type="image/png"/>
    <br/>
  </div>
  <div>
    <en-media hash="0cb8d04258fdbfe33739b2529d81fdb5" title="Attachment" width="1440" type="image/png"/>
  </div>
  <div>
    <br/>
  </div>
</en-note>
As you can see, it contains an en-media tag for each attachment in the note with, including a hash attribute
which corresponds to the hash property available for each note object inside Applescript.
At this point I decided that Applescript wasn’t enough to solve my problem completely, but I still had to use it to extract all the necessary information from Evernote and make it available to another script. Namely, I needed the following data outside of Applescript:
- The note’s ENML content
- The attachment files saved with their hash as filenames
Both could easily be achieved:
tell oNote
  set noteContent to ENML content
  do shell script "echo '" & noteContent & "' > '" & evernoteDataFolder & "note.xml'"

  repeat with oAttachment in attachments
    set noteHash to hash of oAttachment
    write oAttachment to evernoteDataFolder & noteHash & ".png"
  end repeat
end tell
Luckily, Applescript gives us access to shell scripting with do shell script. This makes saving a string to a file by redirecting an echo
output easy enough - from what I found on the internet, this seems to be the solution used by most developers.
After cleaning up a bit and putting the exported files into a subfolder to not pollute Evernote’s sandbox too much, I ended up with
the following code. Please note that I return notePath as script result which points to the folder I saved all the files in.
We’ll need this path in the next step.
# A helper function to create the temp directory to place our files in
on createNoteDir(path)
  do shell script "rm -rf '" & path & "'"
  do shell script "mkdir -p '" & path & "'"
end createNoteDir

tell application "Evernote"
  set notesList to selection
  set oNote to item 1 of notesList
  set evernoteDataFolder to (system attribute "HOME") & "/Library/Containers/com.evernote.Evernote/Data"

  tell oNote
    set noteTitle to title
    set noteContent to ENML content

    # We have to use a temp path that Evernote has access to... and nothing outside
    # its sandboxed container is guaranteed to be.
    set notePath to evernoteDataFolder & "/attachment_export/" & noteTitle & "/"
    my createNoteDir(notePath)

    # Save the note's XML content in a file we can later access.
    # We need it to find out the correct attachment order as Evernote
    # by default orders them by filename
    do shell script "echo '" & noteContent & "' > '" & notePath & "note.xml'"

    repeat with oAttachment in attachments
      # Save each attachment using its hash as filename.
      # This way, we can match it to the values from the XML content later.
      set noteHash to hash of oAttachment
      set imgPath to notePath & noteHash & ".png"

      write oAttachment to imgPath
    end repeat
  end tell

  return notePath
end tell
Running the this script with a note titled “Notiz” containing 2 attachments leads us to the following content on our hard drive:
-
/Users/stex/Library/Containers/com.evernote.Evernote/Data/attachment_export/Notiz-
0cb8d04258fdbfe33739b2529d81fdb5.png -
270493a2b1a89ceeb2528f1c0e97d1f5.png -
note.xml
-
The Ruby Part
Now that all the necessary information was available outside of Evernote, I needed to feed it to another script
which would find out the actual attachment order and run convert for me.
I chose Ruby as Alfred supports it well and… I just like Ruby.
The script assumes that the path the note information was saved to is passed in as first command line argument.
First of all, I had to get the note’s XML content:
require "fileutils"
require "pathname"

NOTE_PATH       = Pathname.new(ARGV[0].strip)
NOTE_XML_FILE   = NOTE_PATH.join("note.xml").to_s

xml = File.read(NOTE_XML_FILE)
As a reminder, this gives us a file containing multiple tags with the attachment information:
<en-media hash="270493a2b1a89ceeb2528f1c0e97d1f5" title="Attachment" width="1979" type="image/png"/>
Since I planned to put this into an Alfred workflow by now, I decided not to use a library like nokogiri
to parse the XML since it would require other users to have it globally installed as a gem.
Instead, I went with a simple regular expression and capture groups to get the hash values out of each tag:
attachments = xml.scan(/en-media hash="(\w+)"/)
  .flatten
  .map { |a| "'" + NOTE_PATH.join("#{a}.png").to_s + "'" }
For the note exported above, this would leave us with the full pathnames to each attachment in the correct order:
attachments
# => ["/Users/stex/Library/.../270493a2b1a89ceeb2528f1c0e97d1f5.png", "/Users/stex/Library/.../0cb8d04258fdbfe33739b2529d81fdb5.png"]
All that’s left to do now is to call convert with the attachments as input files and create a PDF:
PDF_OUTPUT_FILE = File.join("/Users/stex/Downloads", "#{NOTE_PATH.basename}.pdf")

system("convert #{attachments.join(" ")} '#{PDF_OUTPUT_FILE}'")
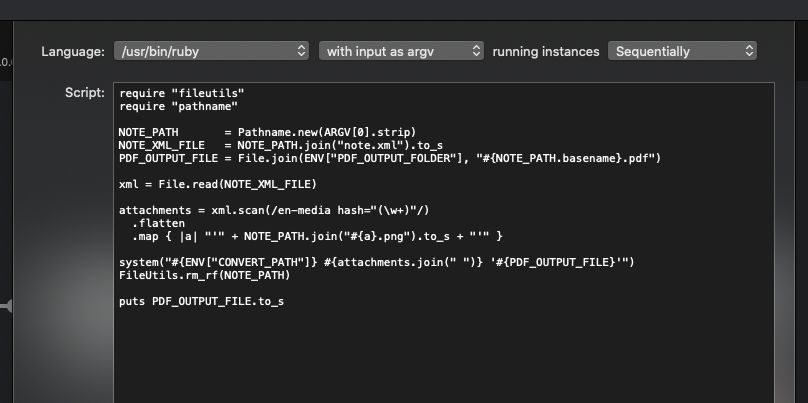
The final script looks as follows. I added a few environment variables to make it customisable for other users and cleaned up Evernote’s sandbox:
require "fileutils"
require "pathname"

NOTE_PATH       = Pathname.new(ARGV[0].strip)
NOTE_XML_FILE   = NOTE_PATH.join("note.xml").to_s
PDF_OUTPUT_FILE = File.join(ENV["PDF_OUTPUT_FOLDER"], "#{NOTE_PATH.basename}.pdf")

xml = File.read(NOTE_XML_FILE)

attachments = xml.scan(/en-media hash="(\w+)"/)
  .flatten
  .map { |a| "'" + NOTE_PATH.join("#{a}.png").to_s + "'" }

system("#{ENV["CONVERT_PATH"]} #{attachments.join(" ")} '#{PDF_OUTPUT_FILE}'")
FileUtils.rm_rf(NOTE_PATH)

puts PDF_OUTPUT_FILE.to_s
Please note that I decided to pass in the full path to the convert utility here as an environment variable.
Alfred runs its code in an environment without sourcing your .bash_profile or similar, leading to a different PATH than you’d expect.
By default, convert resides in /usr/local/bin (when installed through brew), but I wanted to make sure other users
could modify the path if necessary.
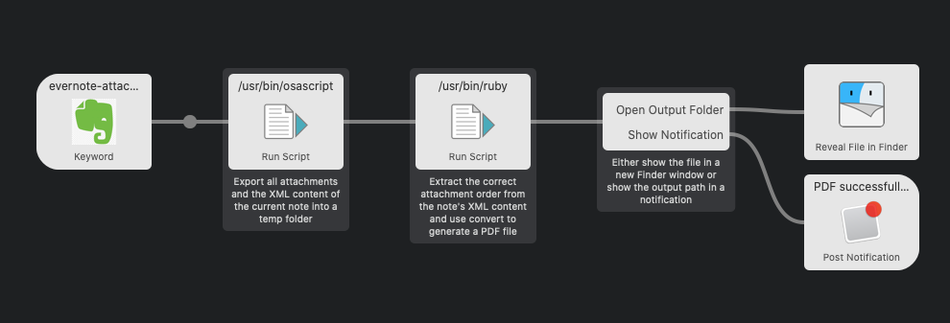
The Alfred Part
Now with both scripts working on their own, I started building a new Alfred workflow to call them in succession. Creating the workflow was pretty straight forward:
- Add a trigger
- Call each script and pipe its output into the next script as command line argument
- Add some convenience for the user (optional)
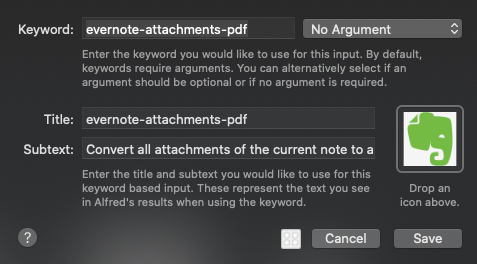
1. Adding a Trigger
While Alfred supports a lot of different trigger events (e.g. hotkeys or Applescript), I went with a simple keyword here.
Whenever the user types evernote-attachments-pdf in Alfred (auto completion is available), it would offer the corresponding command.

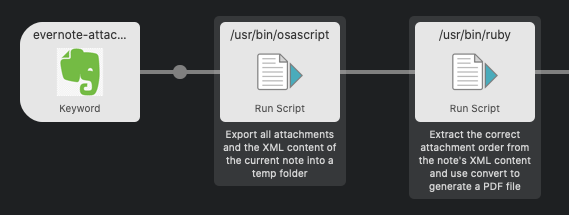
2. Running both Scripts in Succession
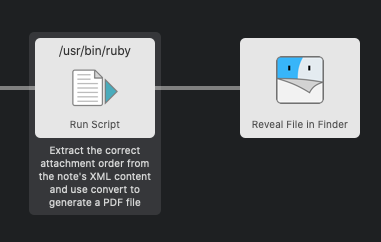
I went with two “Run Script” actions for the Applescript and Ruby parts.
For the Applescript, the input setting didn’t matter, but I had to make sure to set the Ruby script to
take its input as ARGV.
As mentioned before, Alfred always “pipes” the console output of a script to the next action in its workflow.
For Applescript, the value after return is automatically printed out, in our Ruby script, we had to do it manually through puts.
The Ruby script could be used as is, for the Applescript, I had to wrap my code inside a sub-routine:
on run argv
 ...
end run
With this done, we can already run our workflow from Alfred and are presented with a neat PDF inside the output directory. I decided to go a bit further though and give some sort of response to the user to let them know everything worked as expected.
3. Adding some Convenience
Many applications open the directory they put a file in after its creation so I went with the flow and added a “Reveil File in Finder” action to the workflow. Since our Ruby script’s output is the full path to the output directory, I just had to connect it to the Ruby script and everything worked as expected:
Since I personally find this behaviour a bit annoying from time to time, I decided to give the user a choice here.
I defined another environment variable named REVEIL_IN_FINDER and added a conditional block to the workflow:
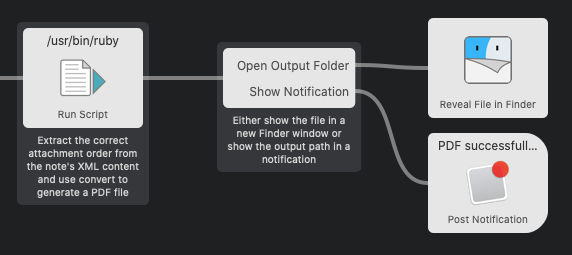

This way, the output folder from my Ruby script would either be sent to the “Reveil File in Finder” action or a notification would be shown instead.
Conclusion
When I started with the Evernote Applescript Dictionary, I was convinced I would have this solved within half an hour… should have learned that after that many years of programming.
While the app sandboxing took me the longest to figure out, it was the easiest to be solved in the end. I was a bit disappointed by the Evernote documentation regarding its Applescript usage, e.g. the order attachments would be returned. This caused me to try a lot of different solutions to work around each newfound behaviour until I finally settled with an additional script.
Anyway, I learned a bit more about MacOS applications and scripting and got a nice PDF export out of it, so definitely worth it.